无题
无题
NeilPVE All in one
本篇文章适用 PVE 9.0
烧录
烧录工具:Ventoy、rufus、balenaEtcher
BIOS设置
intel主板开启VT,VT-D,来电自启动和选择U盘启动
AMD主板开启IOMMU,SVM,来电自启动和选择U盘启动
零刻
暂未整理
安装
1.进行图形化界面安装, Install Proxmox yE (Graphical) 。
2.同意协议, I agree。
3.选择安装的磁盘, Next。
4.选择国家、时区、键盘,Next。
5.设置登入密码 ,Next。
6.网卡设置(en:有线网卡,wl:无线网卡);Hostname:以 example.com格式命名;IP:192.168.x.x。基本保持默认即可。
7.确认信息。安装后reboot,拔掉U盘。
使用图形界面 && SSH
ssh root@192.168.x.x进入ssh页面。
浏览器打开192.168.x.x:8006进入图形管理界面。
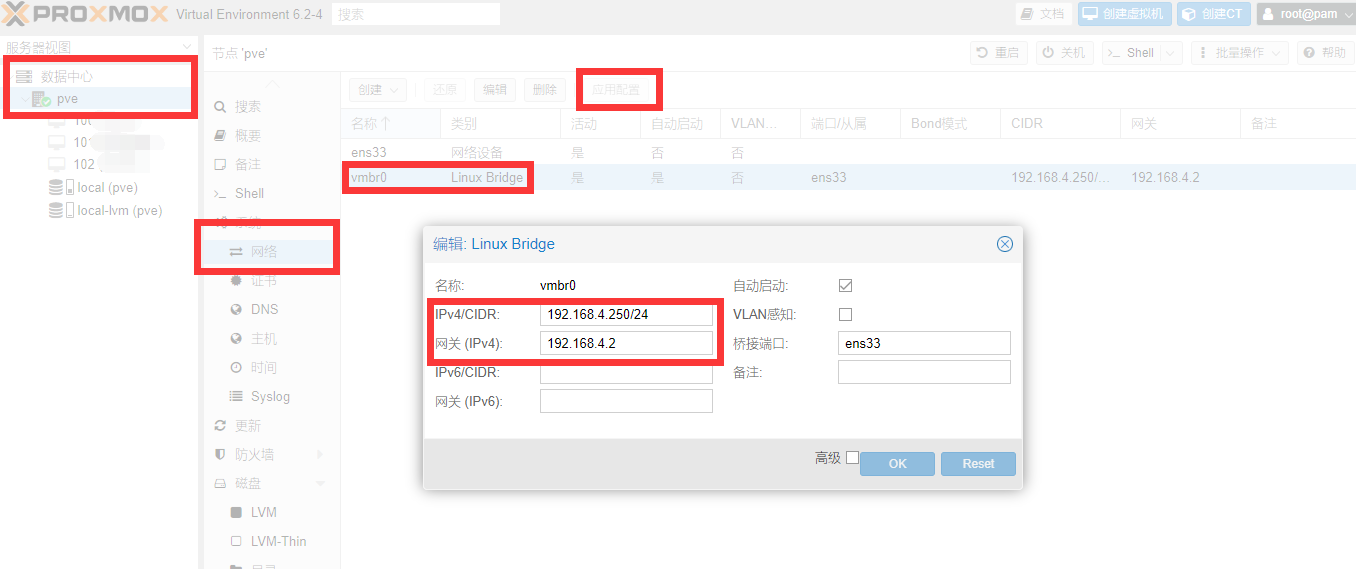
修改图形管理界面IP
第一步,修改IP、网关,文件名为 /etc/network/interfaces。
操作要点:更改/etc/network/interfaces中的virtnet0的IP即可。
具体操作:如果是PVE6.0或之前的版本修改IP需要重启才可生效。如果是PVE版本大于等于6.1,则可以使用web管理页面的网络选项菜单中修改vmbr0的IP,修改完成后,点击应用配置生效即可。此操作无需重启服务器即可应用新IP,但是可能需要检查PVE是否有安装ifupdown2,如果没有安装,应用配置时会弹出报错无法应用,可以手动到shell里使用命令apt install ifupdown2安装好后,再去进行IP修改应用。
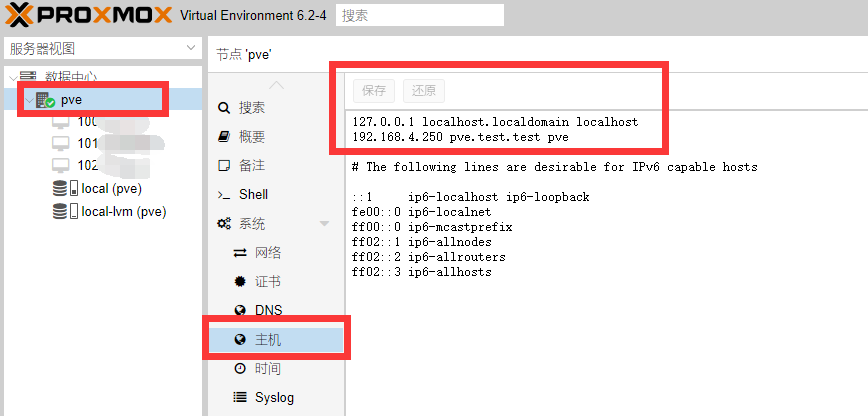
第二步,修改主机名解析的IP,文件名为 /etc/hosts。
重启后的提示语还是显示原来的https://旧IP:8006。这个要是以后忘了就容易出问题。可以更改/etc/hosts文件,也可以在web管理页面主机处修改,修改完记得保存。此操作修改完需要重启才可刷新显示提示语。
第三步,修改
目前在图形界面未发现修改方法。
pve_source 自动化脚本(暂未用过)
1 | wget -q -O /root/pve_source.tar.gz 'https://bbs.x86pi.cn/file/topic/2023-11-28/file/01ac88d7d2b840cb88c15cb5e19d4305b2.gz' && tar zxvf /root/pve_source.tar.gz && /root/./pve_source |
移除local-lvm
扩容可能会影响PVE的部分快照功能。
1 | lvremove pve/data |
再点击 数据中心 – 存储 – local-lvm – 移除,再双击local,把内容里的所有选项都选中。
去除PVE无有效订阅提示
pve6.3 - pve7+版本可以执行
1 | sed -Ezi.bak "s/(Ext.Msg.show\(\{\s+title: gettext\('No valid sub)/void\(\{ \/\/\1/g" /usr/share/javascript/proxmox-widget-toolkit/proxmoxlib.js && systemctl restart pveproxy.service |
pve8.0+版本可以执行
1 | sed -i.backup -z "s/res === null || res === undefined || \!res || res\n\t\t\t.data.status.toLowerCase() \!== 'active'/false/g" /usr/share/javascript/proxmox-widget-toolkit/proxmoxlib.js && systemctl restart pveproxy.service |
pev9.0+版本可以执行
1 | sed -Ezi.bak "s/(Ext.Msg.show\(\{\s+title: gettext\('No valid sub)/void\(\{ \/\/\1/g" /usr/share/javascript/proxmox-widget-toolkit/proxmoxlib.js && systemctl restart pveproxy.service |
开启PVE直通功能
1 | #若你的CPU为Intel: |
增加所需模块,修改文件/etc/modules:
1 | echo -e "vfio\nvfio_iommu_type1\nvfio_pci\nvfio_virqfd" | tee -a /etc/modules |
更新上述配置信息并重启PVE:
1 | update-grub |
验证:
1 | dmesg | grep iommu |
看看可直通设备列表:
1 | lspci |
配置源
- 清华源:https://mirrors.tuna.tsinghua.edu.cn/help/debian/
- 中科大源:https://mirrors.ustc.edu.cn/help/debian.html
备份
1 | cp /etc/apt/sources.list /etc/apt/sources.list_bak |
编辑sources.list文件注释掉自带的源
1 | nano /etc/apt/sources.list |
6.x清华源:
1 | deb https://mirrors.tuna.tsinghua.edu.cn/debian/ buster main contrib non-free |
7.x国内源:
1 | #清华源: |
8.x国内源:
1 | #清华源: |
9.x国内源:
1 | nano /etc/apt/sources.list.d/debian.sources |
1 | Types: deb |
编辑PVE企业源,原句前加#注释掉自带源:
1 | # -8.x |
按Ctrl+X -> Y – >回车退出。
修复源401错误,原句前加#注释掉(若无401错误可忽略):
1 | # -8.x |
按Ctrl+X -> Y – >回车退出。
更新生效:
1 | apt update && apt dist-upgrade -y |
开启核显SR-IOV(若需要)
SR-IOV项目地址:https://github.com/strongtz/i915-sriov-dkms ,(教程为pve9.0 内核6.14.8-2-pve)此插件不是任何版本都支持的,需要查找对应版本。
安装
1 | apt install build-* dkms git sysfsutils -y |
clone代码库,此处需要pve连接github。
1 | git clone https://github.com/strongtz/i915-sriov-dkms.git |
安装sriov模块
1 | cd i915-sriov-dkms |
编辑 grub 配置文件
1 | nano /etc/default/grub |
在 quiet 后添加i915.enable_guc=3 i915.max_vfs=7的“7”表示可以添加7个虚拟核显(最多7个):
1 | # 这里不要改动,我就是改了那个7琢磨了半天 |
更新grub和initramfs
1 | update-grub |
查看当前核显ID,并记录:
1 | lspci | grep VGA |
将上面记录的核显ID替换下面代码中的0000:00:02.0(有可能没有显示0000:,下面的代码中补全即可),sriov_numvfs = 1 中的 1 是需要虚拟的核显数量,不能大于7(前边设置的7),添加数量越多同时使用时核显性能越弱,大家按需选择,我这里设置为1:
1 | echo "devices/pci0000:00/0000:00:02.0/sriov_numvfs = 3" > /etc/sysfs.conf |
重启后输入以下命令查看SR-IOV核显直通是否成功:
1 | lspci | grep VGA |
卸载
使用manual卸载 dkms 模块(下面代码改为自己的版本号,这里以2025.02.03为例)
1 | dkms remove i915-sriov-dkms/对应的版本号 |
重启PVE
1 | reboot |
🖥︎虚拟机
上传镜像
点击 数据中心 - local - IOS 镜像 - 上传
💿️iKuai
添加镜像:
选择
创建虚拟机-填写名称ikuai下一步-镜像选择ikuai.iso下一步-机型选择q35下一步- 磁盘大小2g下一步- 核心2 类别选择host下一步- 内存2g下一步- 其他默认 -完成启动&安装:
调整光盘启动顺序,配置好需要的网卡。选中
ikuai虚拟机-控制台-Start Now,选择-1-将系统安装在硬盘 - 选择-y-- 安装后点击关机旁的下拉停止- 选择硬件-移除光驱,同时按照提示修改ikuai的访问ip地址,用浏览器ip:80登入ikuai的管理界面,默认账号密码 admin。设置 wan 和虚拟 lan
在
数据中心-虚拟机-网络添加虚拟网卡关闭
ikuai虚拟机-硬件-添加网络设备设置完命令行reboot虚拟机,不然ikuai有时会启动不了。
设置完DHCP服务后,电脑可以设置回ip自动获取。
💿️iStoreOS
上传ios文件完成时候,复制下第一行代码。(img文件挂载)
1 | /var/lib/vz/template/iso/istoreos-24.10.2-2025092610-x86-64-squashfs-combined.img |
创建虚拟机时候操作系统选择不使用任何介质,硬盘也删除。
执行上面qm命令后,手动选择iStoreOS - 硬件 - 选择未使用的磁盘0 - 添加。
然后选择选项 - 引导顺序 - 硬盘应用后拉到上面。
开机,跑码后输入下面代码
1 | quickstart |
默认用户名:root,默认密码:password,设置为旁路由模式。
iStoreOS插件下载:https://github.com/AUK9527/Are-u-ok/tree/main/x86
注意:如果发现登不上管理界面,在设置完ip后再去设置ikuai的链路聚合。
💿️HAOS
关键设置调整为 系统 - BOIS - OVMF(UEFI) - 去掉 添加EFI磁盘 勾选

硬盘 - 总线/设备 - SATA
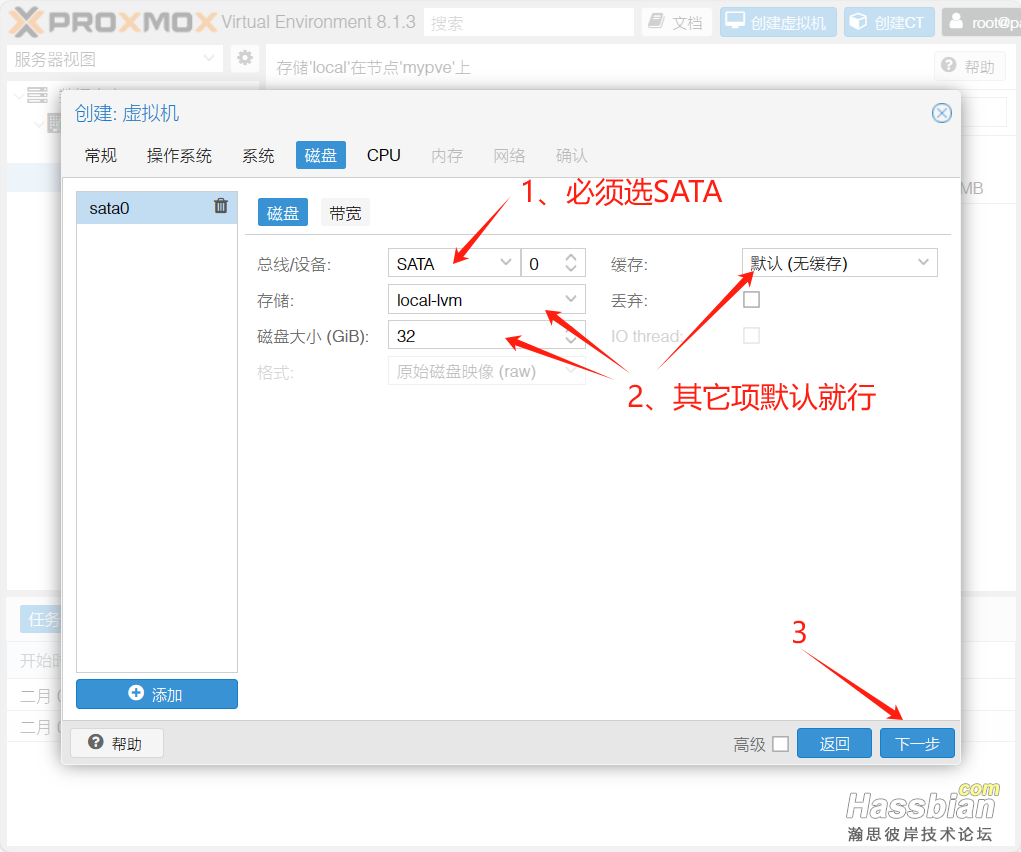
下面2核2G内存起步(2G内存很吃紧建议多给点)
然后启动进PE,点击桌面图标安装。
在Homeassistant终端界面可以使用下面命令查看冬瓜伴侣的管理界面:
1 | login |
等全部跑完我重启,别问为什么跟着重启就对了。
💿️Debian 13
➡️安装
非图形界面安装:参考原文-葤柒
➡️设置
1.配网
查询网卡:
1 | ip addr |
打开配置文件:
1 | nano /etc/network/interfaces |
添加配置:
1 | auto ens18 |
设置dns:
1 | echo "nameserver 8.8.8.8" >> /etc/resolv.conf |
2.安装基础软件
1 | apt update -y && apt install curl sudo wget git unzip -y |
3.设置远程登入
打开配置文件:
1 | nano /etc/ssh/sshd_config |
修改或添加:
1 | PasswordAuthentication yes # 允许密码认证 |
保存后重启服务:
1 | systemctl restart sshd.service |
登入时候可能出现类似错误:这是由于这台远程登入的主机曾经登入过相同ip的服务器。
2
3
4
5
6
7
8
9
10
11
12
13
@ WARNING: REMOTE HOST IDENTIFICATION HAS CHANGED! @
@@@@@@@@@@@@@@@@@@@@@@@@@@@@@@@@@@@@@@@@@@@@@@@@@@@@@@@@@@@
IT IS POSSIBLE THAT SOMEONE IS DOING SOMETHING NASTY!
Someone could be eavesdropping on you right now (man-in-the-middle attack)!
1 45.32.60.172 ecdsa-sha2-nistp256 AAAAE2VjZHNhLXNoYTItbmlzdHAyNTYAAAAIbmlzdHAyNTYAAABBBEOnFSe9yLW07FHWpwYhNuv0I0it/m7e3nrE1G3HaxKx61hoKbnJNa7EpCGJi7XidZkMjIt is also possible that a host key has just been changed.
The fingerprint for the RSA key sent by the remote host is
SHA256:/2qkxJbKtP2Sar5a5WesSj+hDhZxc3b2JqjOuxuKbOk.
Please contact your system administrator.
Add correct host key in /Users/linxp/.ssh/known_hosts to get rid of this message.
Offending RSA key in /Users/linxp/.ssh/known_hosts:2
RSA host key for 14.29.158.224 has changed and you have requested strict checking.
Host key verification failed.解决方法:把
用户/.ssh/known_hosts下对应IP的内容清除即可。
💿️Win10
注意:
系统安装时先不要添加虚拟核显,也不要勾选主GPU,在系统安装完后再添加。
virtIO驱动ISO 有时候最新版本有问题,可以找找前面的版本。
安装:
下载 virtIO驱动ISO (我安装时最新版本有问题,不能识别到有效驱动,我改用旧版本virtio-win-0.1.221.iso)。
安装虚拟机时候Bios选择UEFI - EFI 选择local。
创建完配置文件后,硬件 - 添加 CD/DVD Drive - 存储 选择 local - 镜像 选择 virtIO.iso。
调整引导顺序,启动。到选择安装的磁盘 - 加载驱动程序 - 浏览 - 打开virtIO的下拉菜单找到vioserial(倒数第三个)- win10 - amd64
进win10系统后 - 找到光驱 - virtio-win-gt-x64.msi安装下。
直通核显:
硬件 - 添加 - pci设备 - 原始设备 找到未直通的显卡
进入windows后下载 英特尔® Arc™ 和锐炬® Xe 显卡 (intel.cn)并安装。


